> ## Documentation Index
> Fetch the complete documentation index at: https://docs.testdino.com/llms.txt
> Use this file to discover all available pages before exploring further.
# Remote MCP Server
> Bring TestDino into ChatGPT, Claude on the web, or other AI assistants. Query test runs and manual cases in chat.
export const HowToSchema = ({name, description, steps = []}) => {
const schema = {
"@context": "https://schema.org",
"@type": "HowTo",
name,
...description ? {
description
} : {},
step: steps.map(({name: stepName, text}, i) => ({
"@type": "HowToStep",
position: i + 1,
name: stepName,
text
}))
};
return ;
};
TestDino's Remote MCP server at `https://mcp.testdino.com` connects to ChatGPT, Claude on the web, and other AI assistants that support remote MCP.
Prefer a local CLI install? See [Local MCP Server](/mcp/local) for Claude Code, Cursor, and Claude Desktop.
## Quick Reference
| Topic | Best for |
| :---------------------------------------------- | :----------------------------------------------------------- |
| [Prerequisites](#prerequisites) | What you need before starting |
| [Quick Start](#quick-start) | Add TestDino in Claude on the web or ChatGPT, then authorize |
| [Verify the connection](#verify-the-connection) | First `health` prompt and expected output |
| [Troubleshooting](#troubleshooting) | OAuth, scope, and connector errors |
| [Tools Reference](/mcp/tools-reference) | All 33 tools with parameters and video demos |
## Prerequisites
* Sign in to [TestDino](https://app.testdino.com)
* An AI assistant that supports remote MCP (ChatGPT, Claude on the web, others)
* A Personal Access Token from TestDino (generate one inline, or paste an existing token).
**Warning**
Treat the PAT like a password. Anyone holding it can act on your behalf within its granted scope. Revoke and regenerate from **Profile → My Account → Personal Access Tokens** if it leaks.
## Quick Start
Walkthrough below covers Claude on the web and ChatGPT. The TestDino OAuth flow at the end is the same for any AI assistant that supports remote MCP.
Go to [claude.ai](https://claude.ai) and open **Settings → Connectors** (or **Profile → Connectors**, depending on plan).
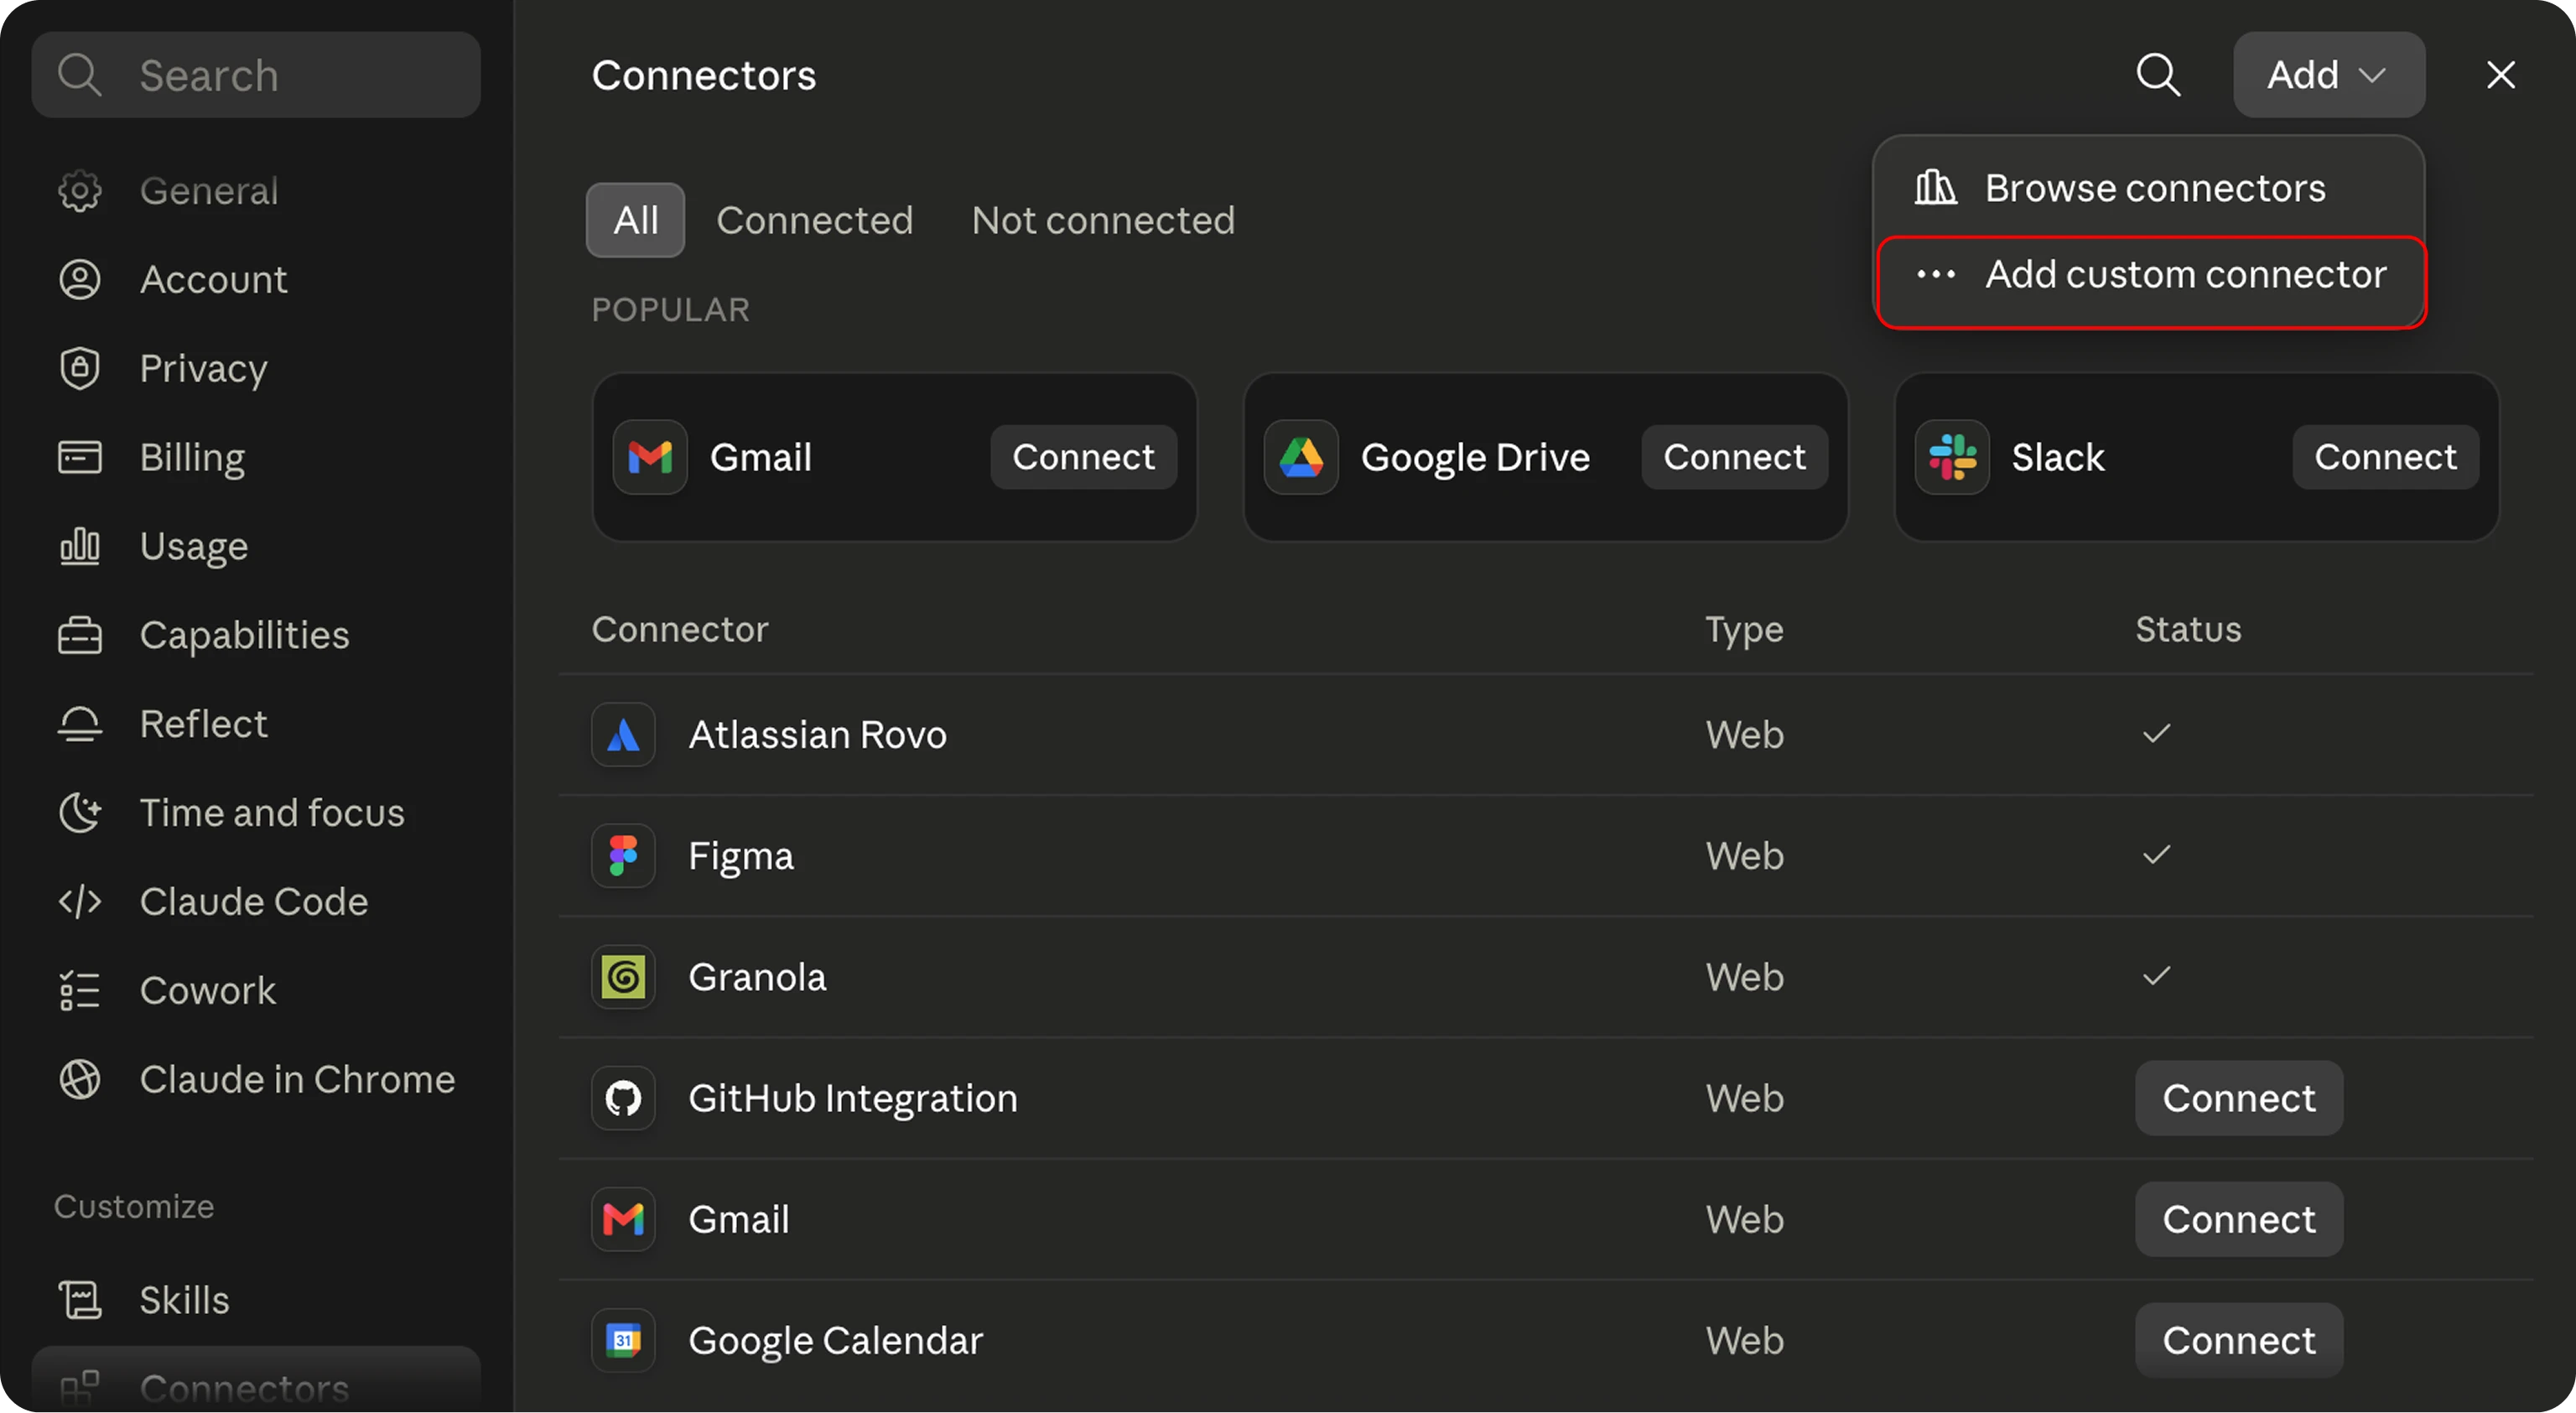 Click **Add custom connector** and fill in:
* **Name**: `TestDino`
* **Server URL**: `https://mcp.testdino.com`
Click **Add custom connector** and fill in:
* **Name**: `TestDino`
* **Server URL**: `https://mcp.testdino.com`
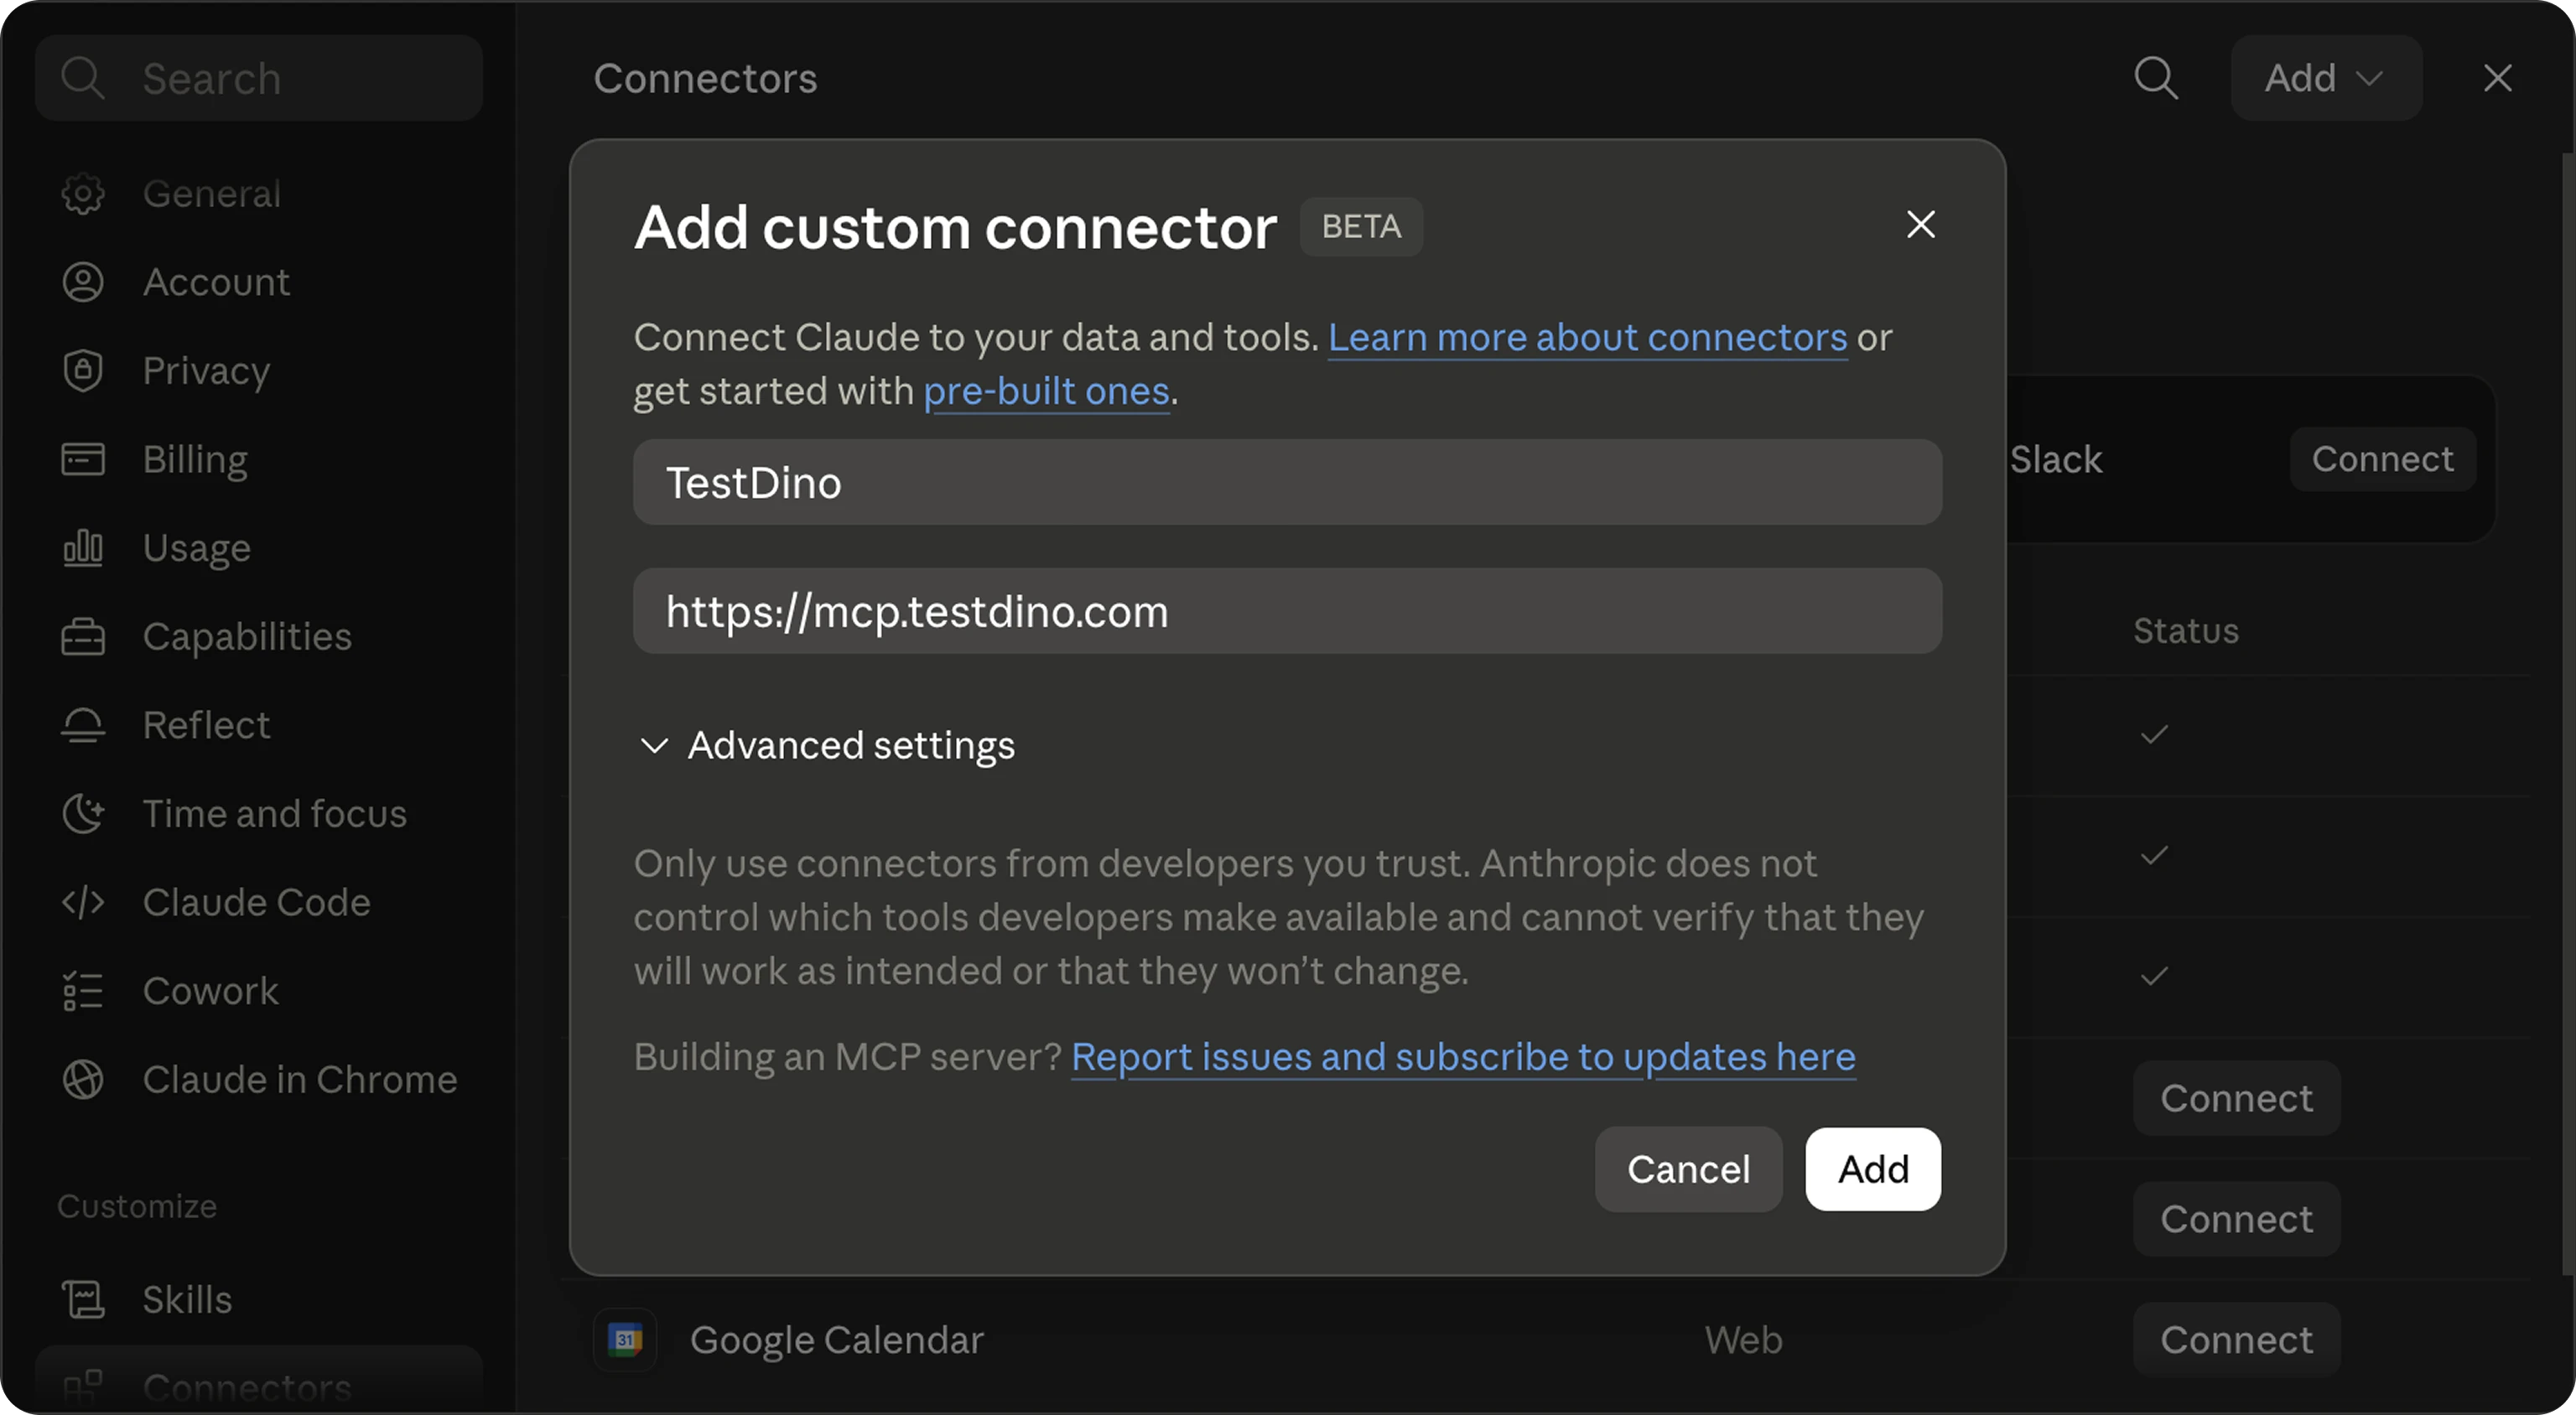 Click **Add**. Claude redirects you to TestDino's authorization page.
In ChatGPT, open **Settings → Apps**. Scroll to **Advanced settings** and click **Create app**.
Click **Add**. Claude redirects you to TestDino's authorization page.
In ChatGPT, open **Settings → Apps**. Scroll to **Advanced settings** and click **Create app**.
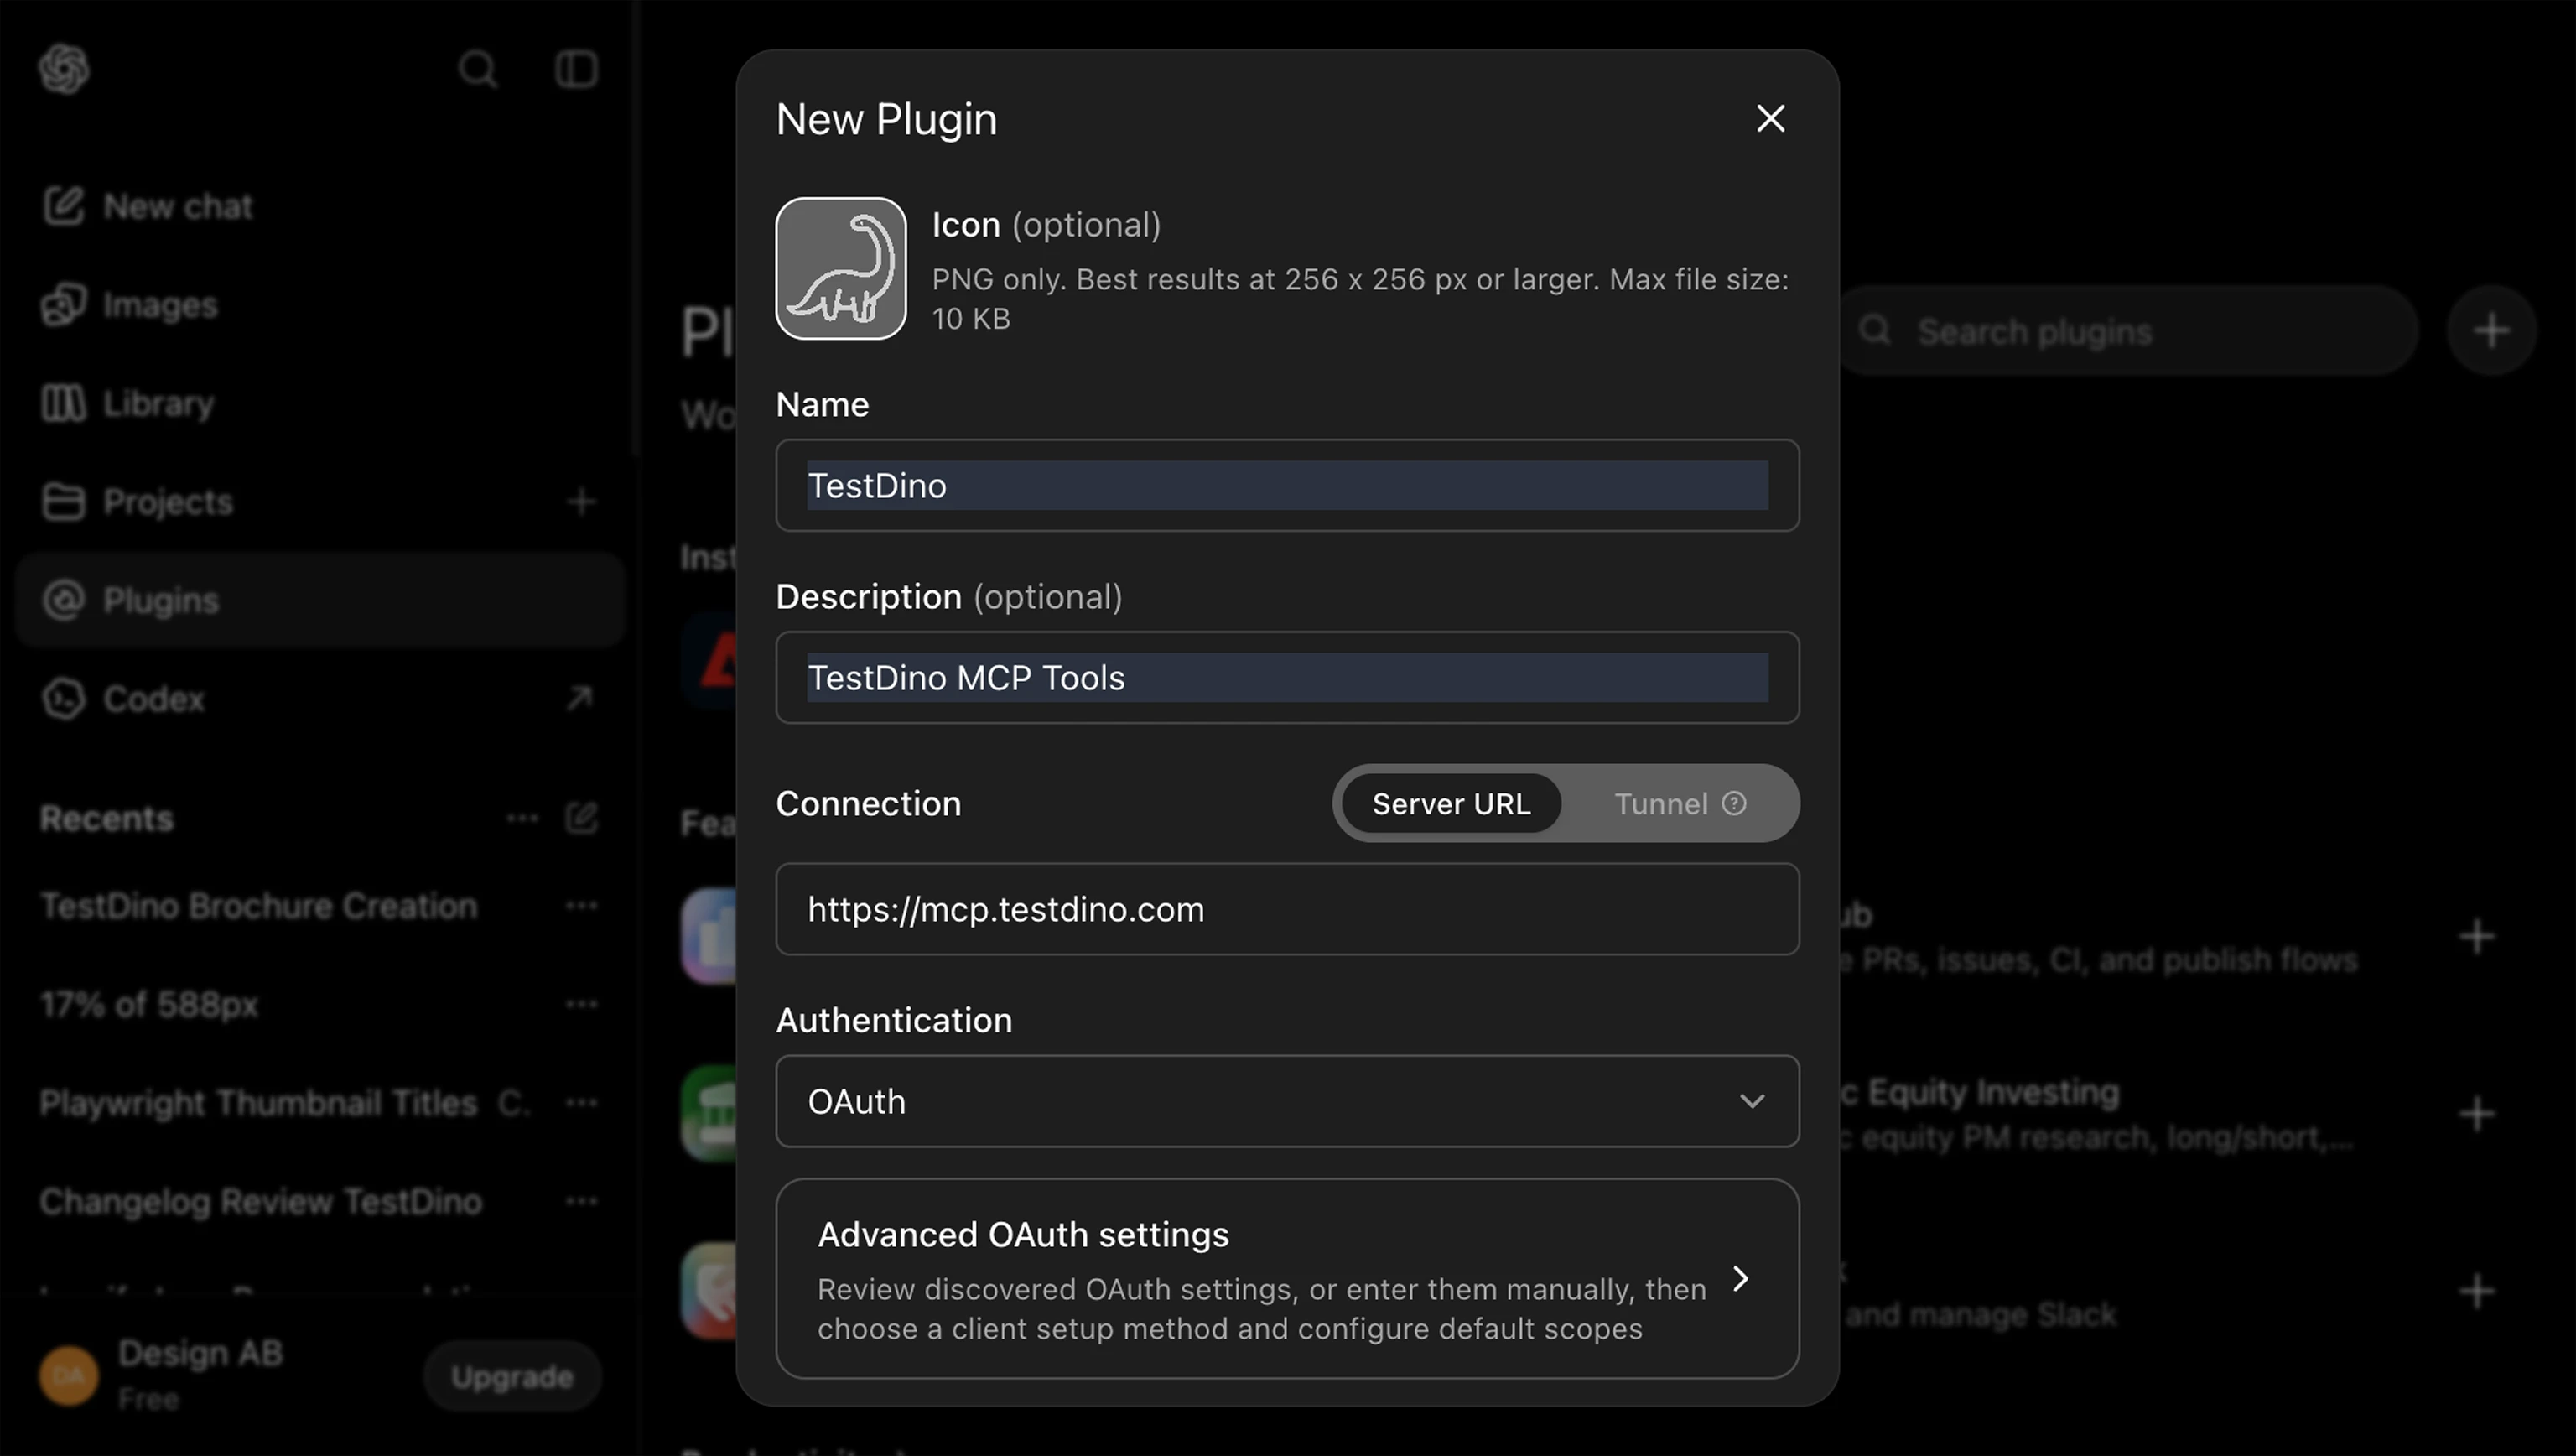
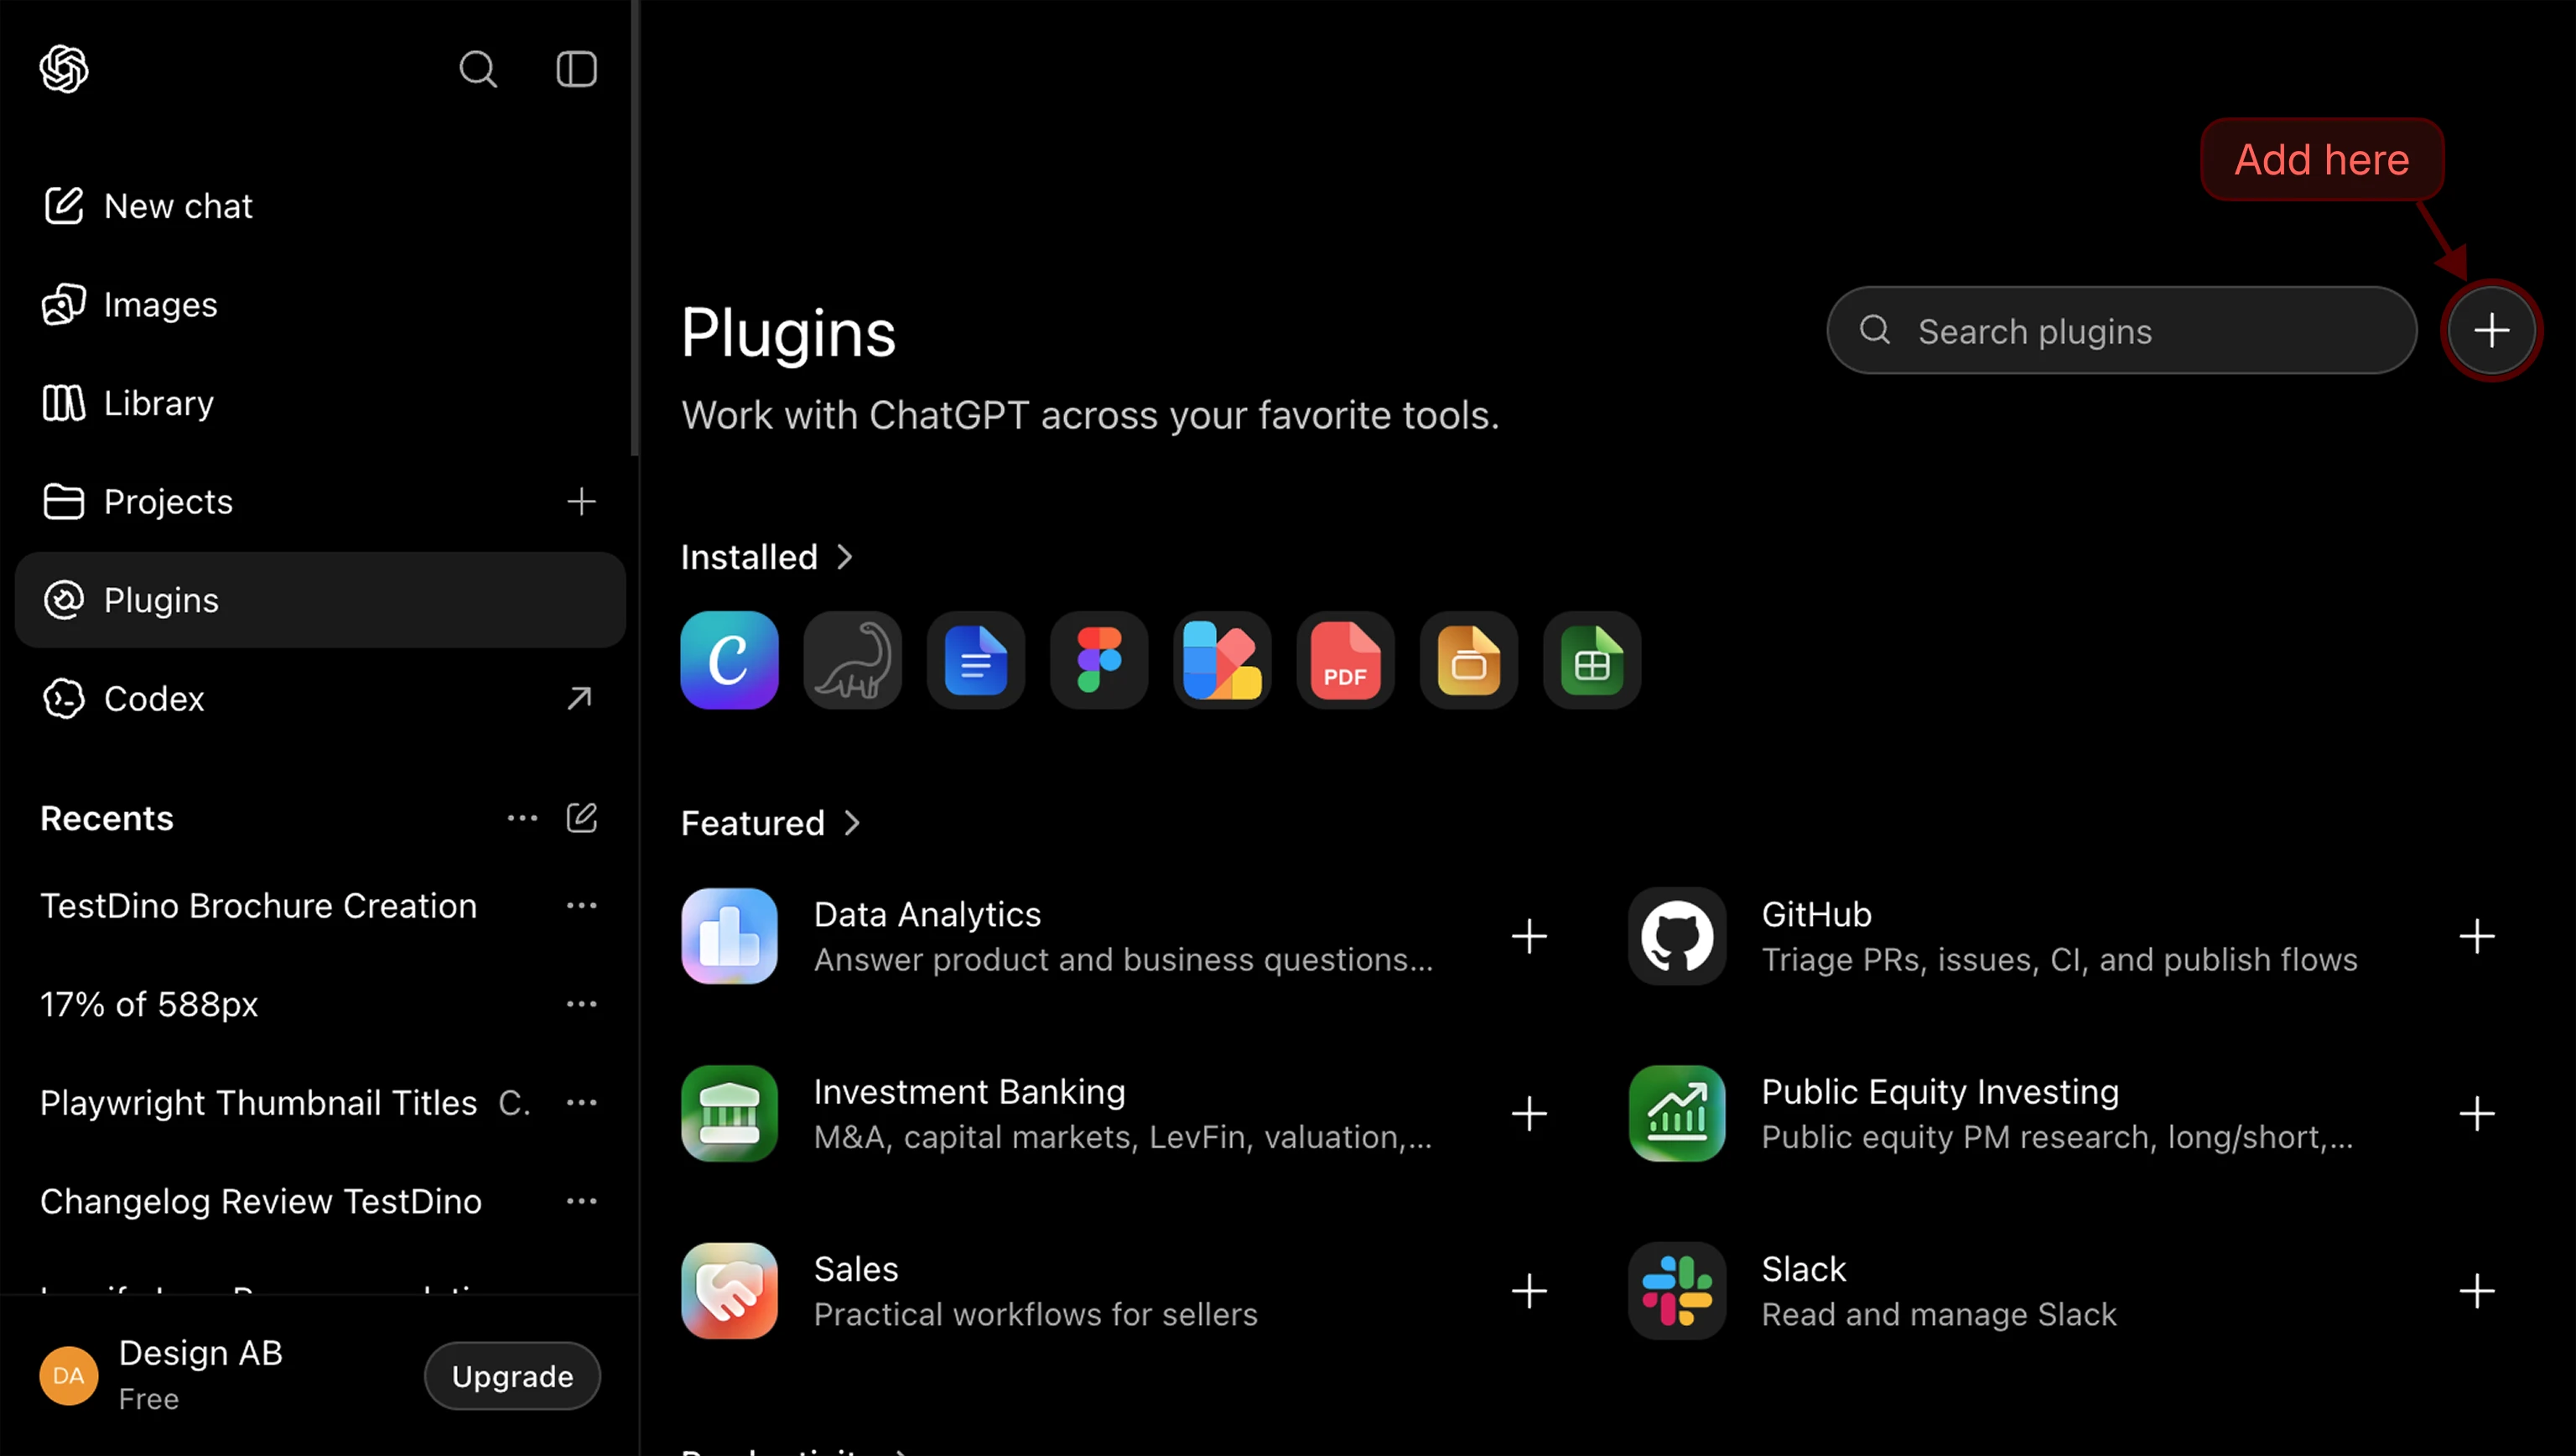 In the **New App** dialog, set:
* **Name**: `TestDino`
* **MCP Server URL**: `https://mcp.testdino.com`
* **Authentication**: `OAuth` (default)
Check **I understand and want to continue**, then click **Create**.
In the **New App** dialog, set:
* **Name**: `TestDino`
* **MCP Server URL**: `https://mcp.testdino.com`
* **Authentication**: `OAuth` (default)
Check **I understand and want to continue**, then click **Create**.
 ChatGPT redirects you to TestDino's authorization page.
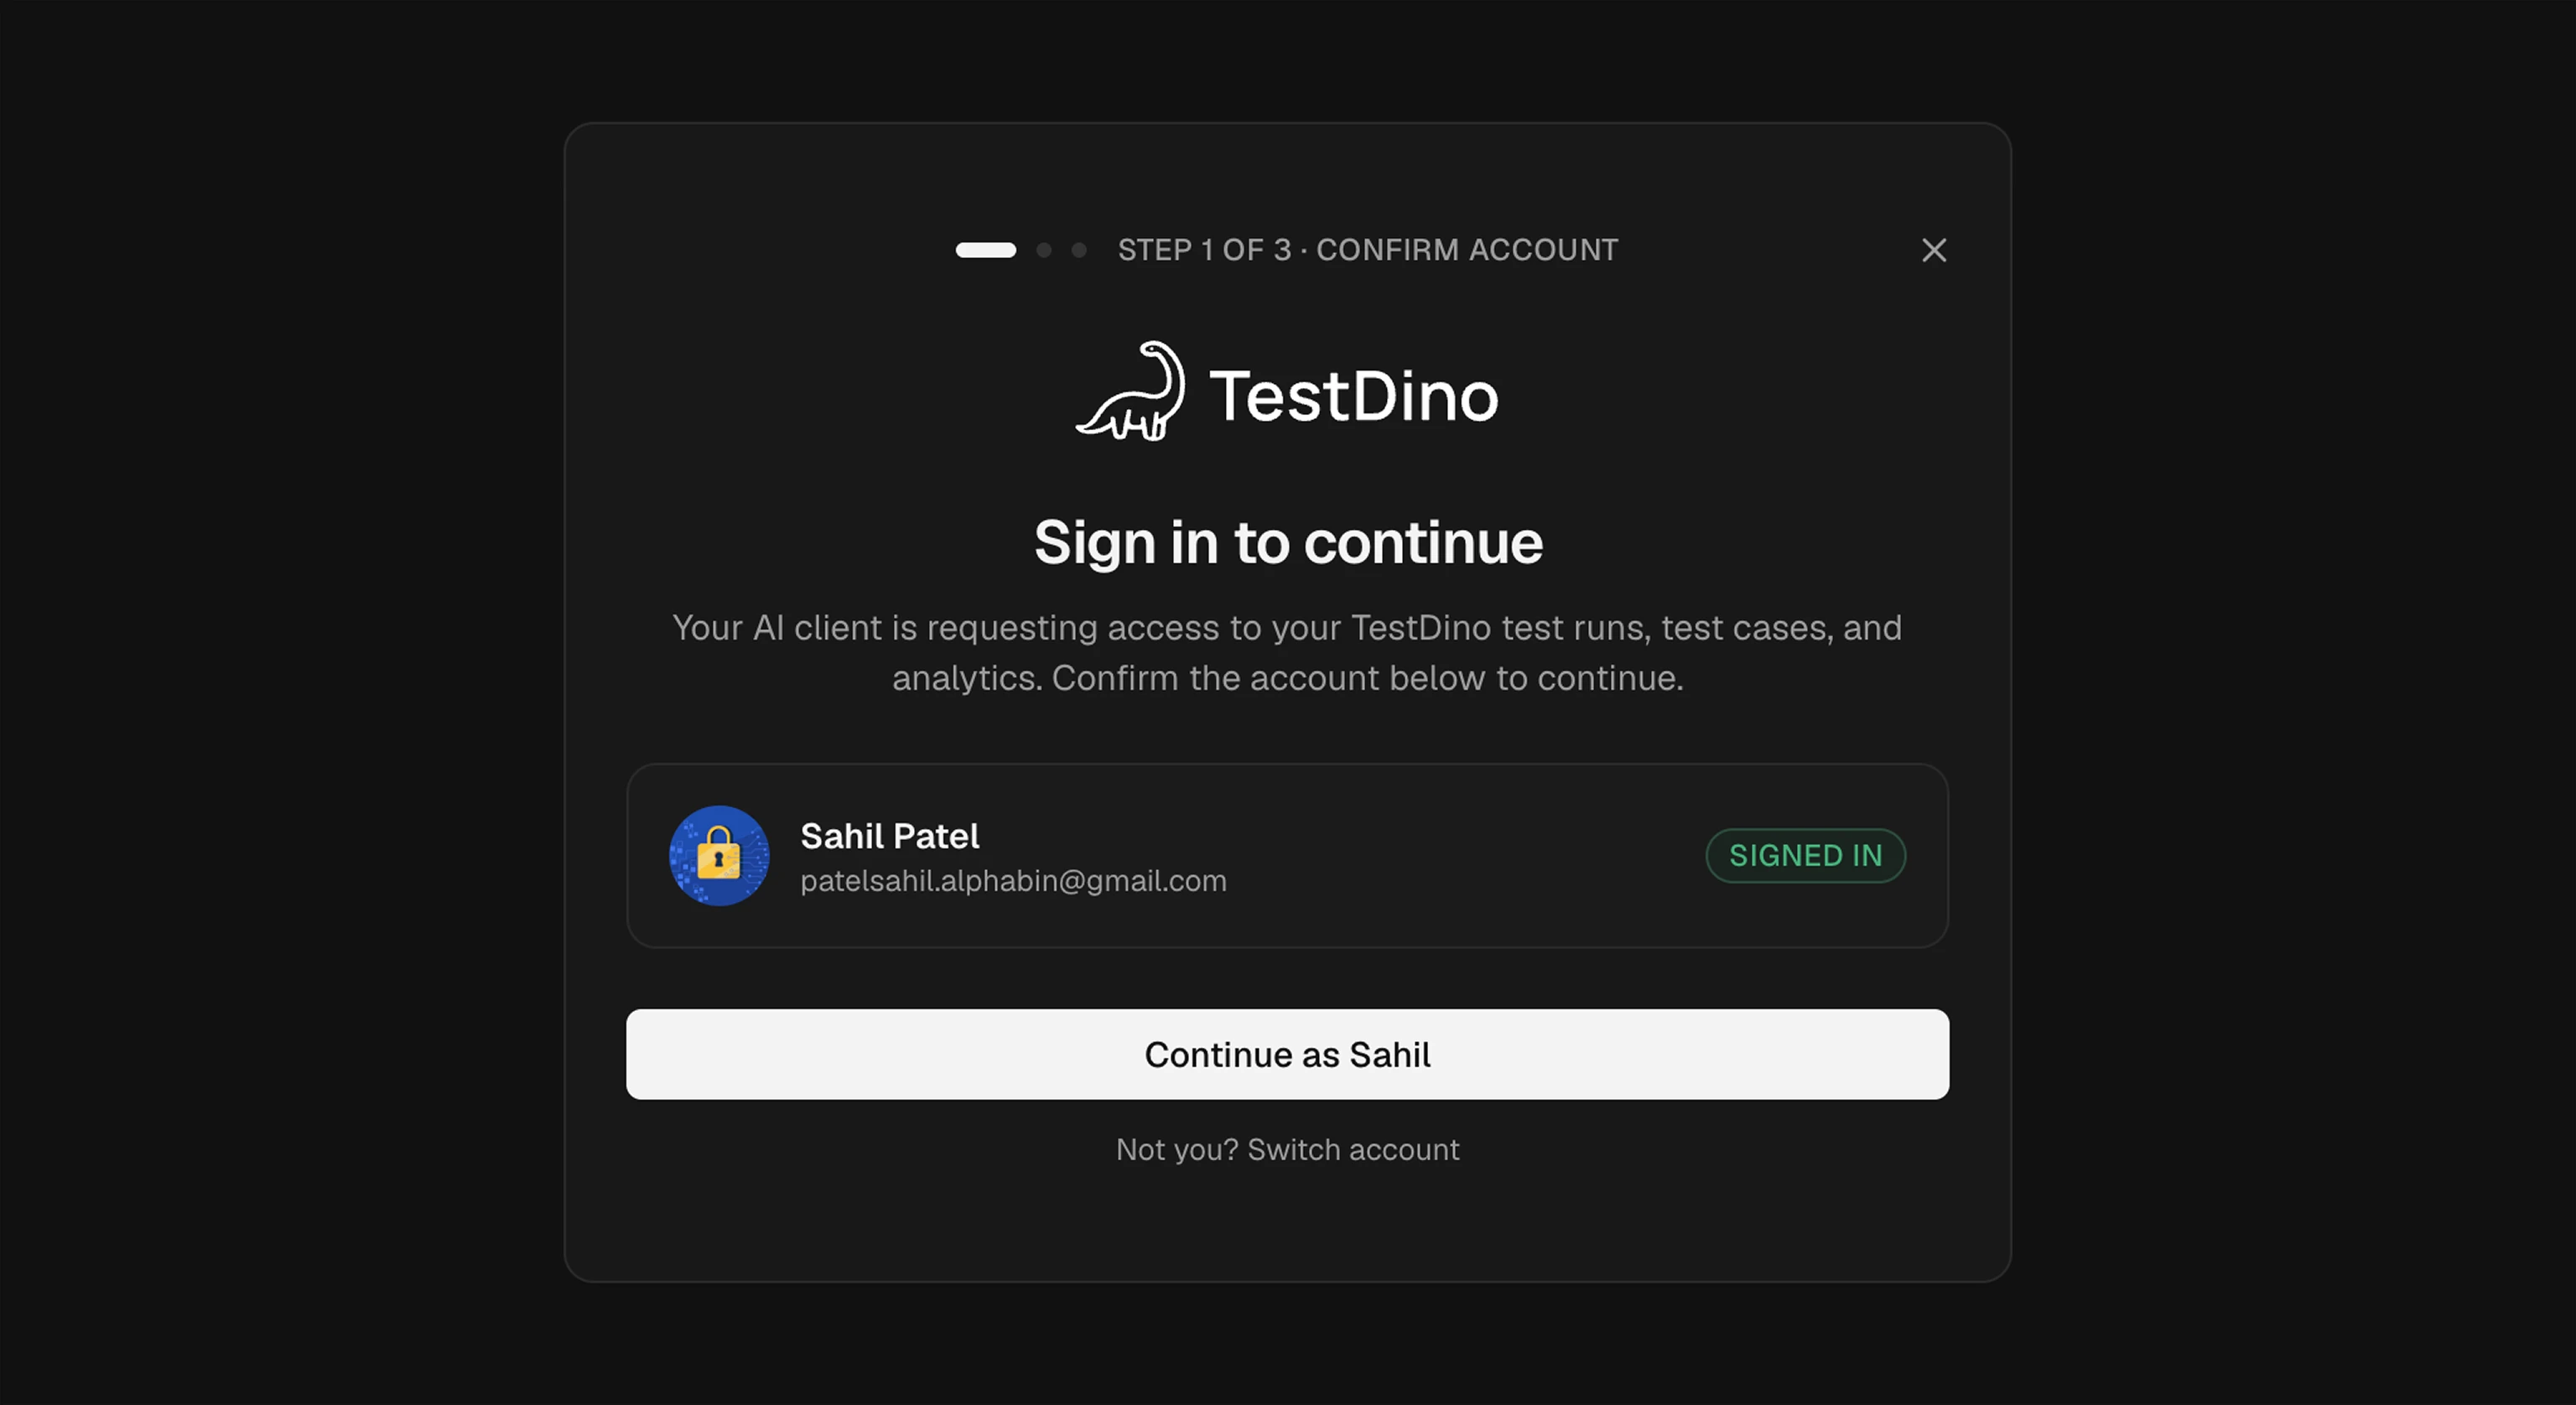
Sign in to TestDino if you aren't already. The dialog confirms which account will authorize the connection.
ChatGPT redirects you to TestDino's authorization page.
Sign in to TestDino if you aren't already. The dialog confirms which account will authorize the connection.
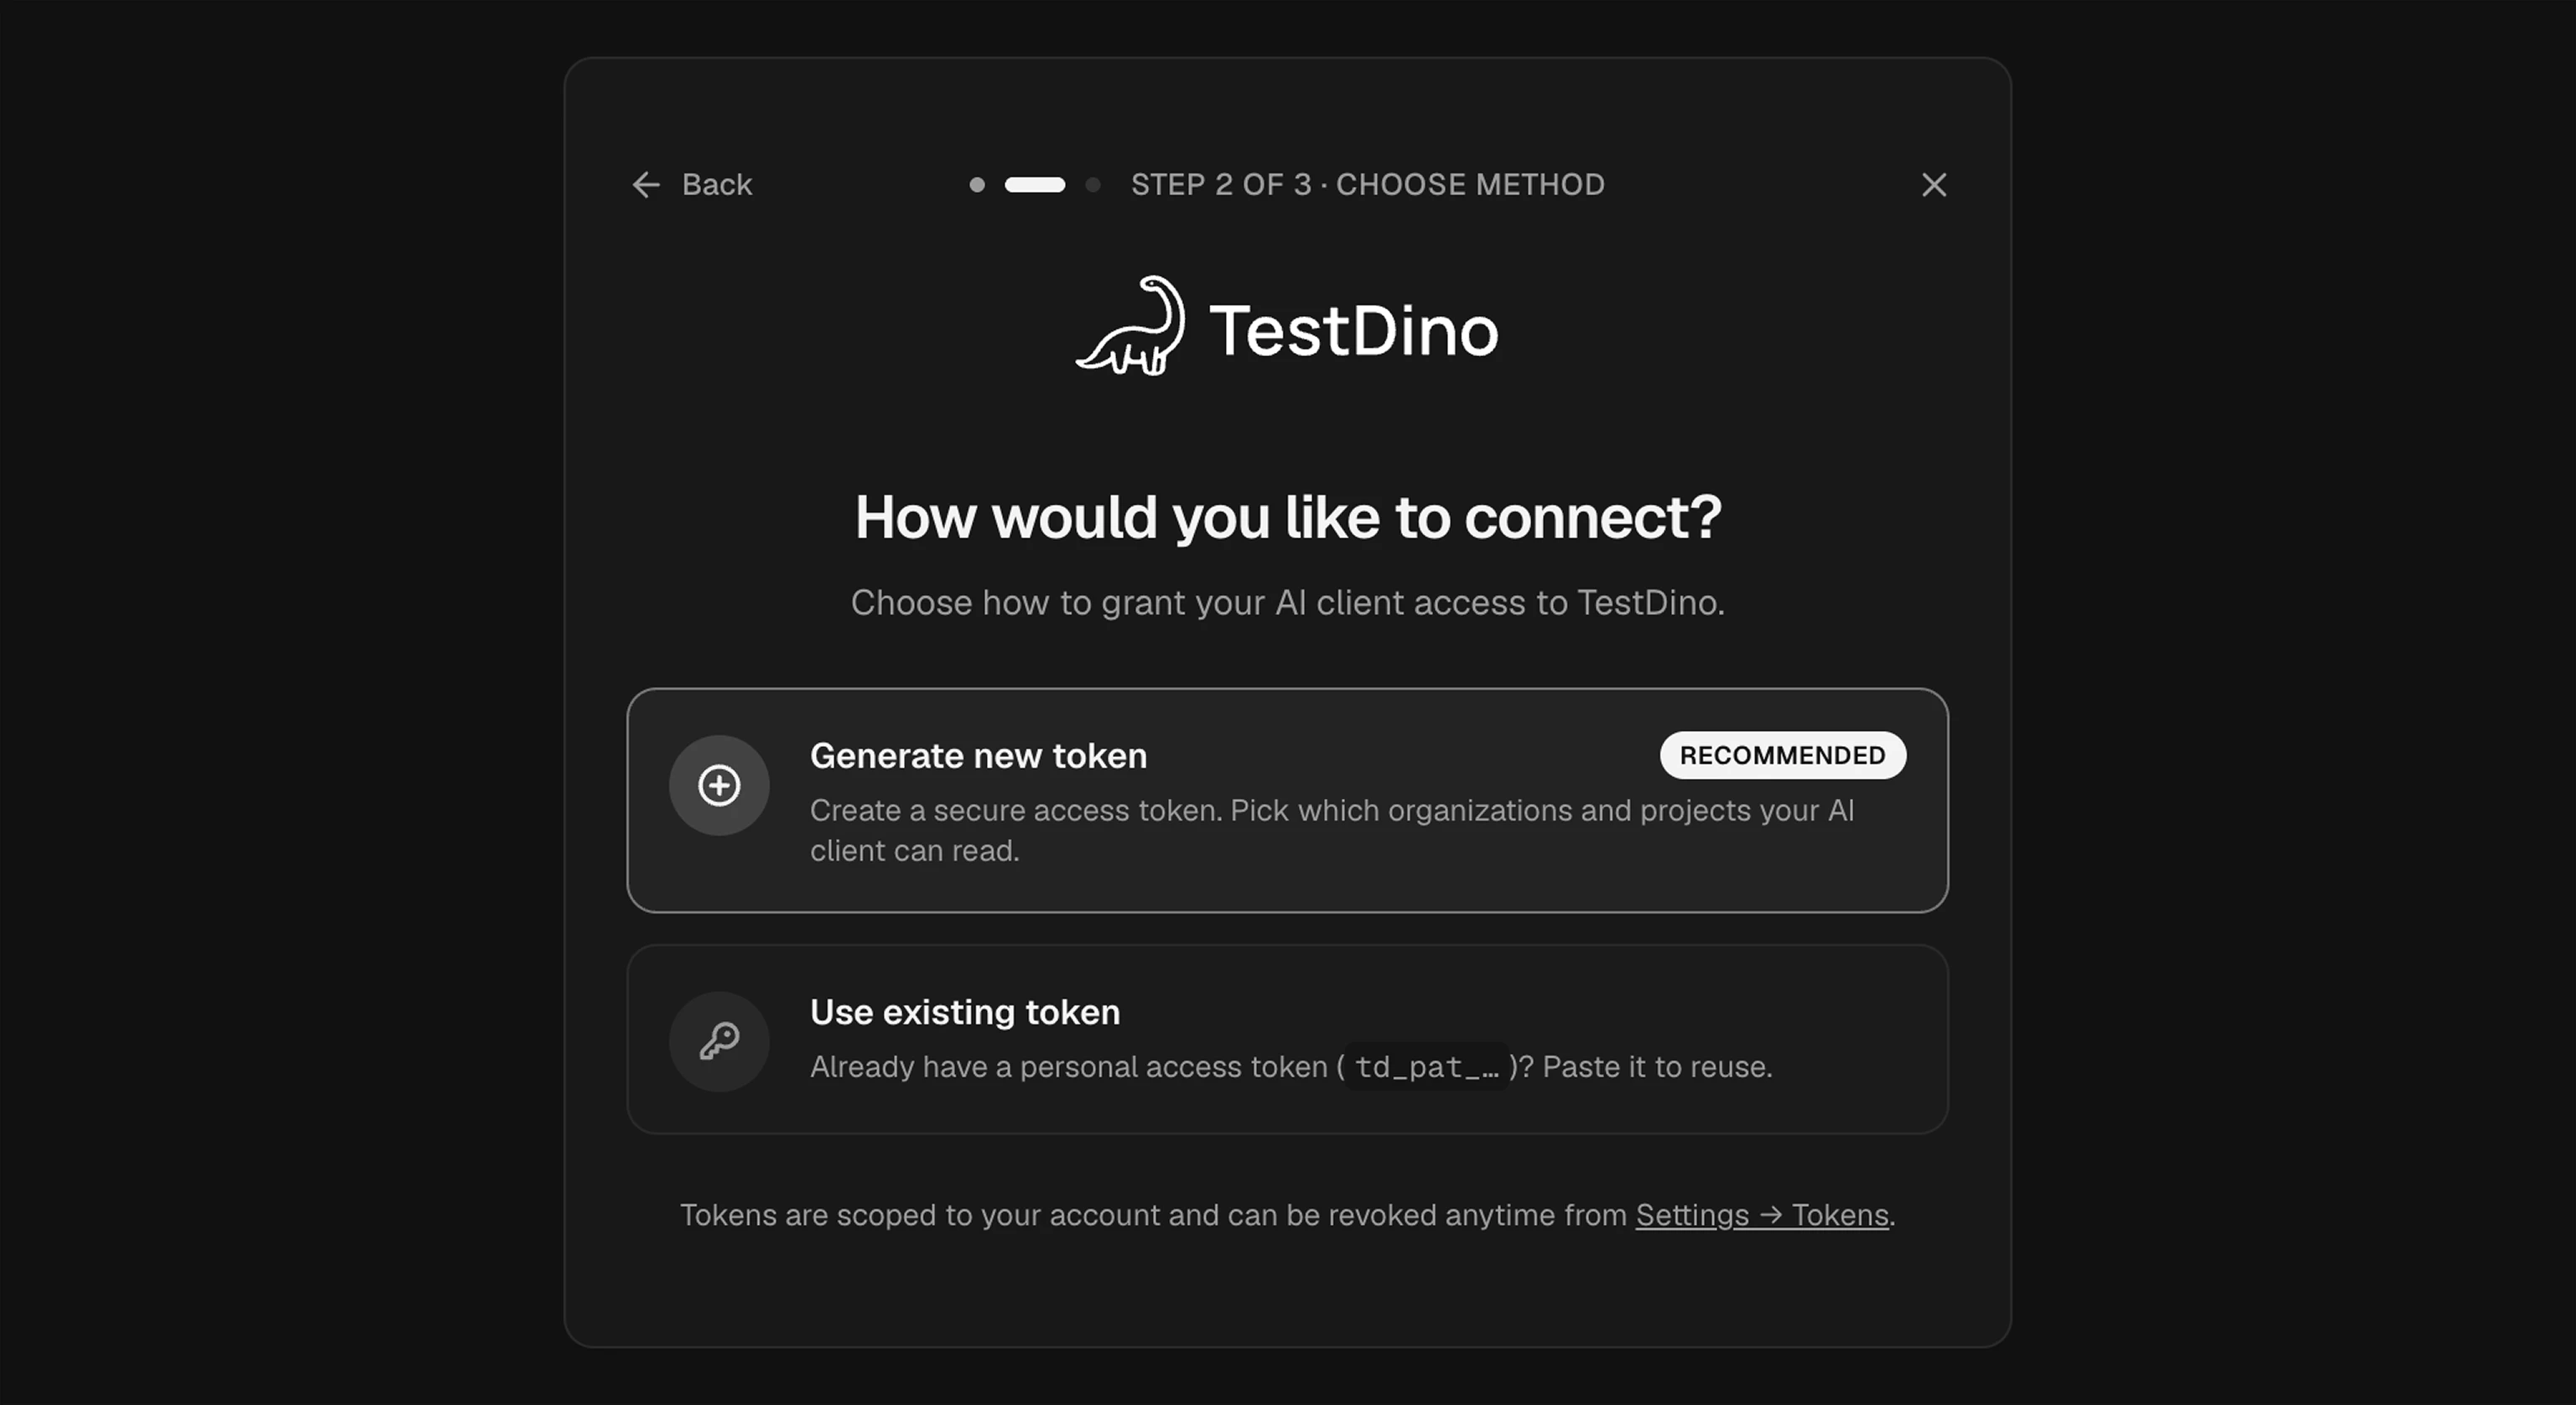
 Pick how your AI assistant gets a PAT.
* **Generate a new token** (recommended): TestDino opens a scope picker where you select exactly which organizations, projects, and modules the AI assistant can read.
* **Use an existing token**: paste a `td_pat_`-prefixed PAT you already created in TestDino settings.
Pick how your AI assistant gets a PAT.
* **Generate a new token** (recommended): TestDino opens a scope picker where you select exactly which organizations, projects, and modules the AI assistant can read.
* **Use an existing token**: paste a `td_pat_`-prefixed PAT you already created in TestDino settings.
 Complete the path you picked.
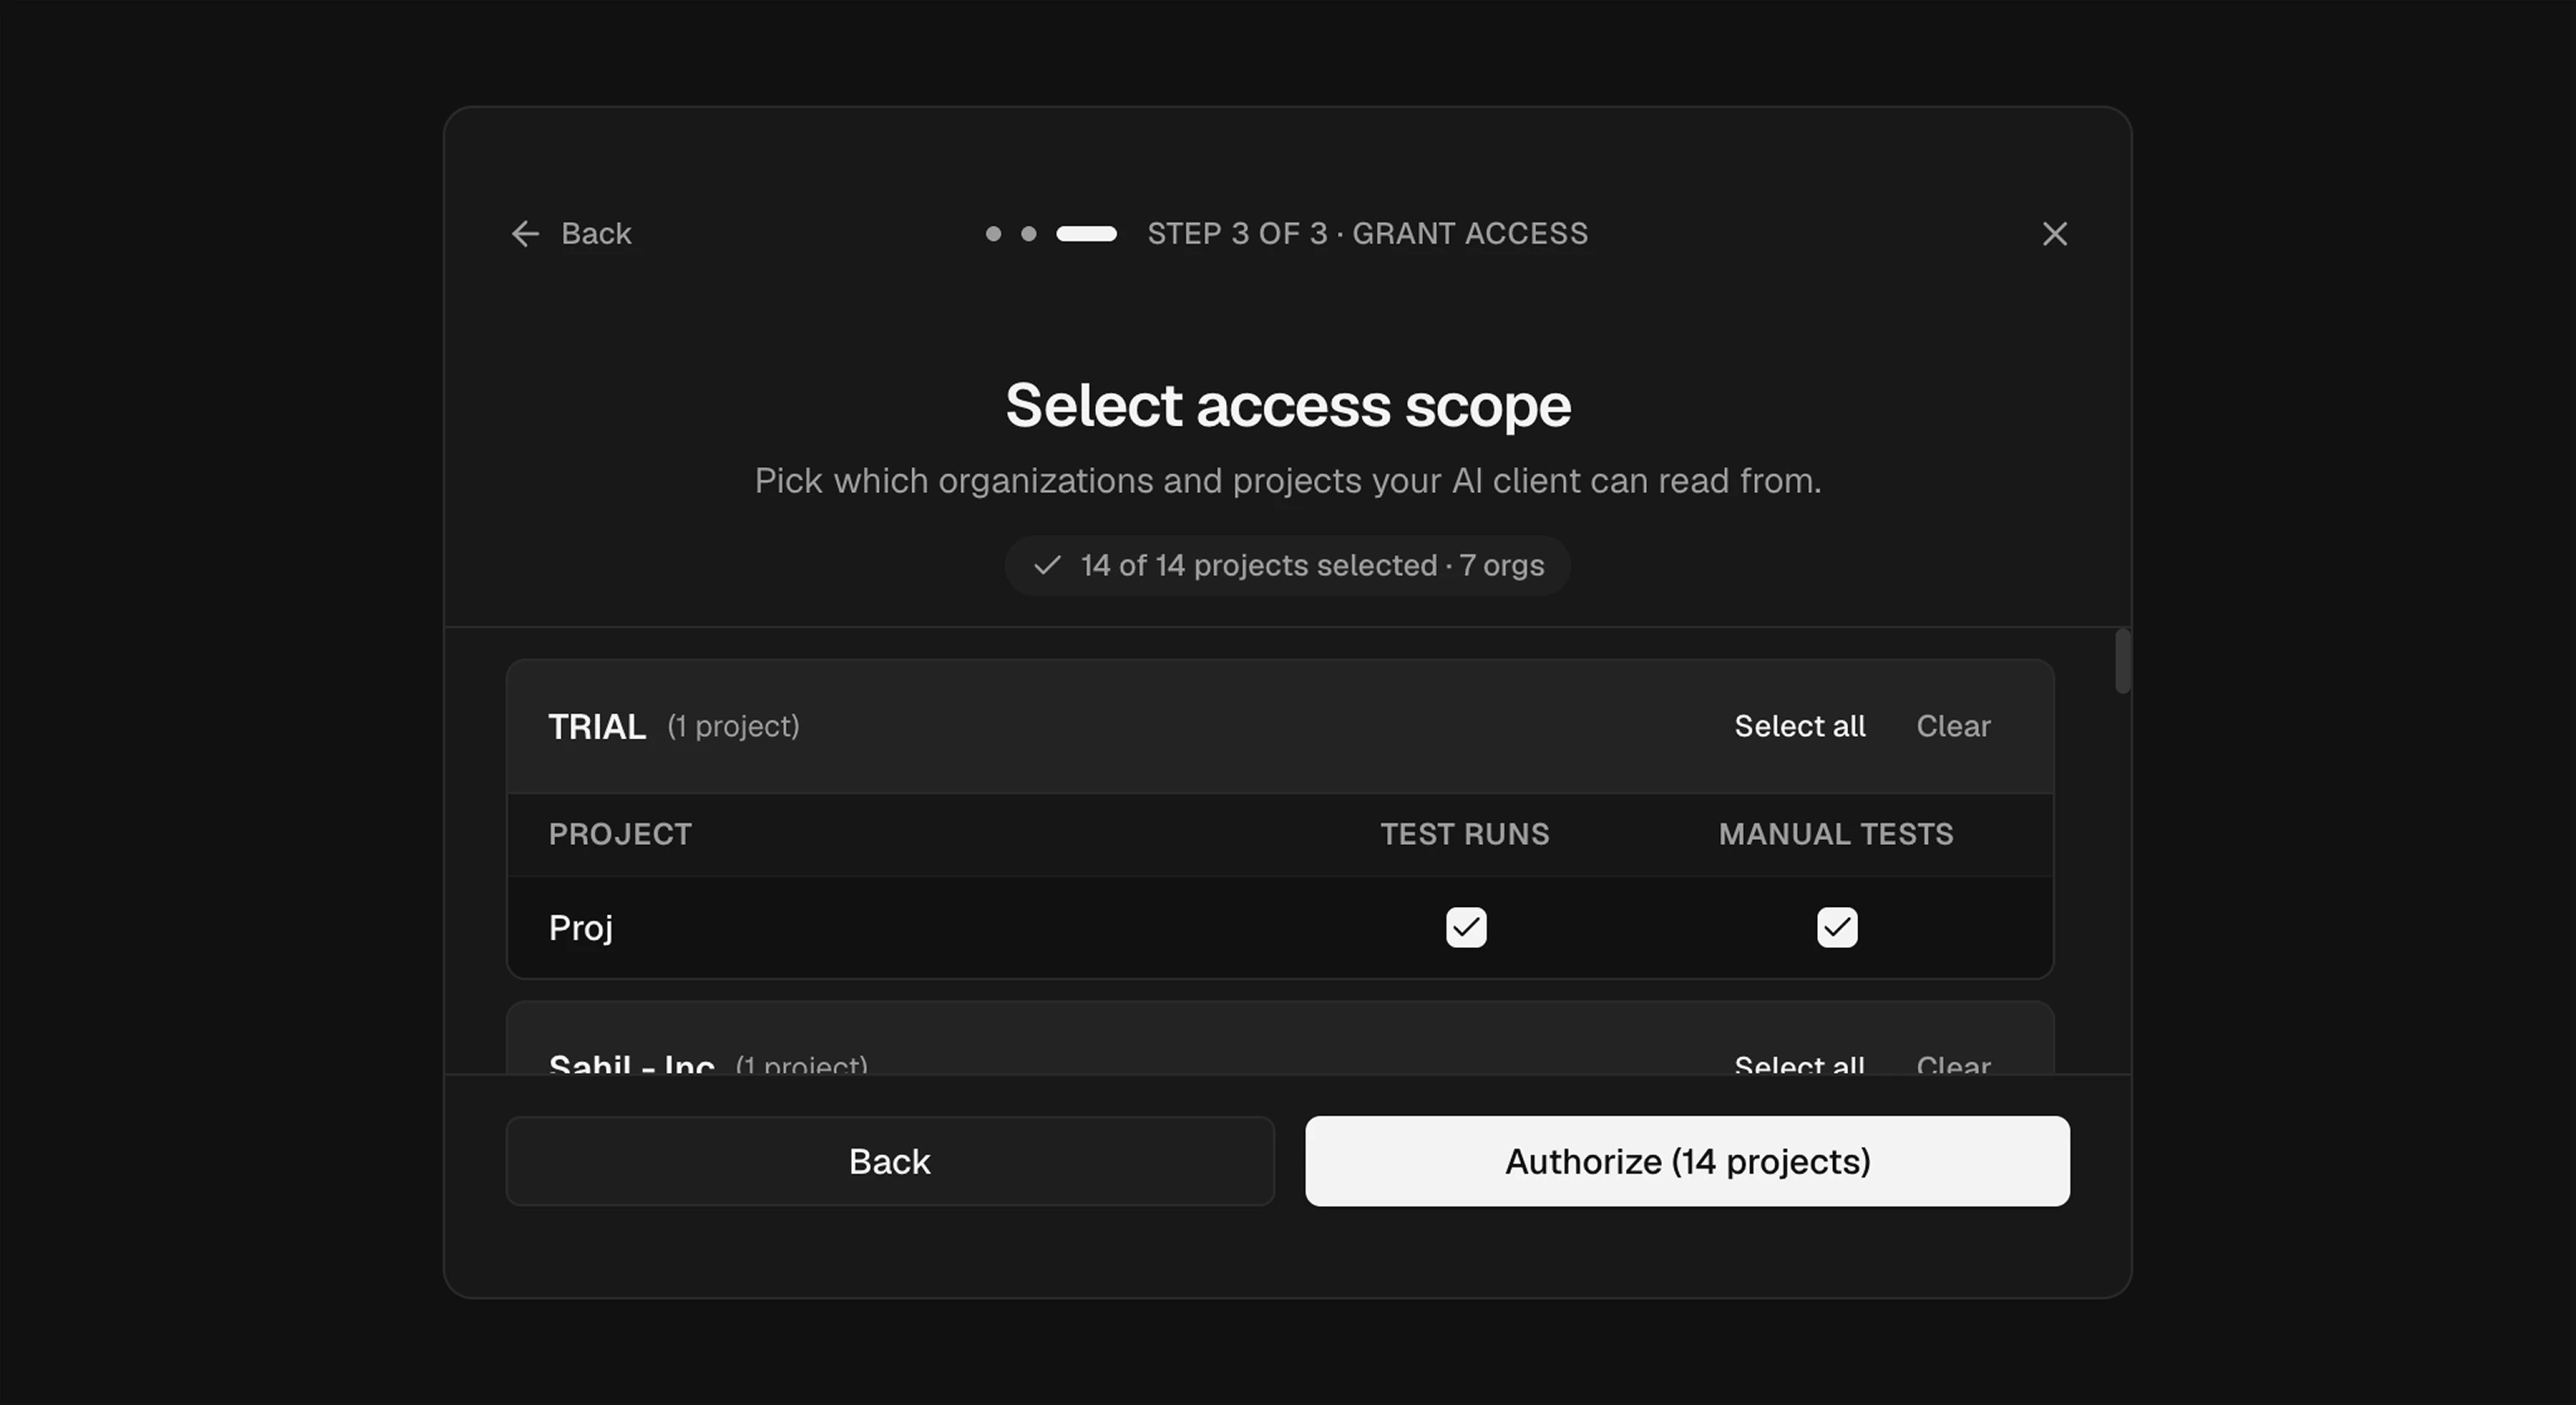
**If you chose Generate a new token**: select the access scope. Each project has separate **Test Runs** and **Manual Tests** toggles. Click **Authorize**.
Complete the path you picked.
**If you chose Generate a new token**: select the access scope. Each project has separate **Test Runs** and **Manual Tests** toggles. Click **Authorize**.
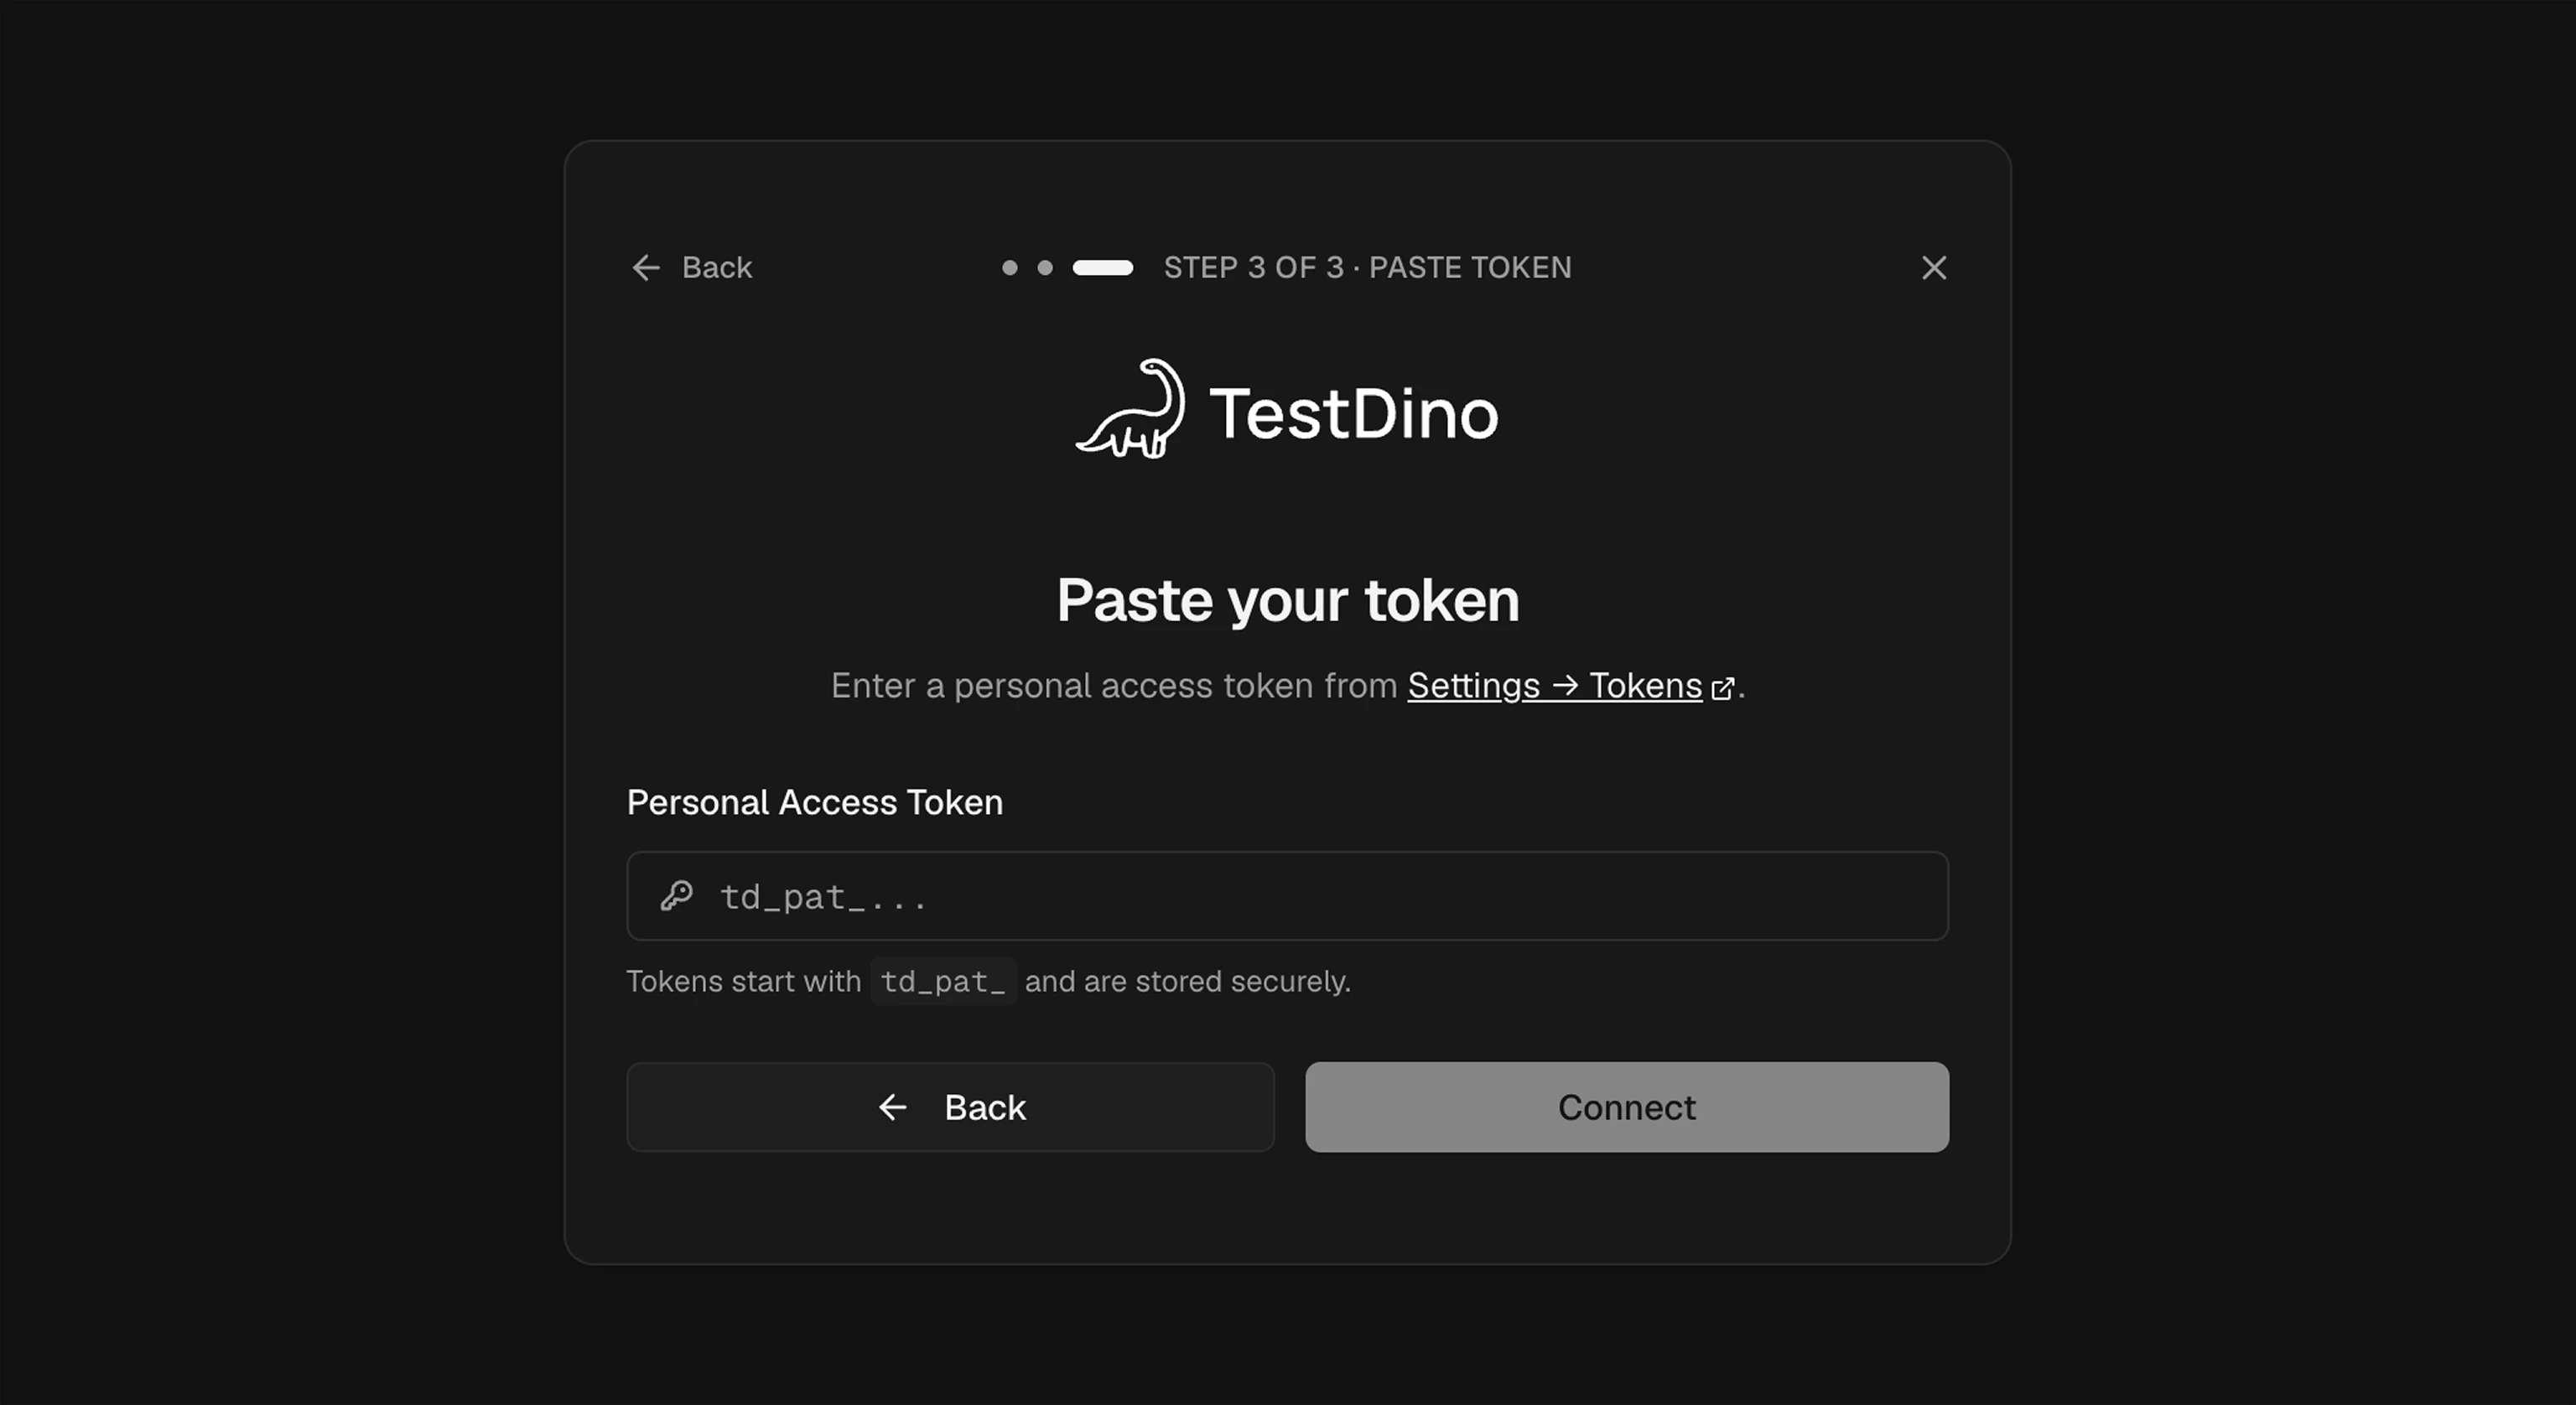
 **If you chose Use an existing token**: paste your `td_pat_`-prefixed PAT. Click **Connect**.
 After TestDino redirects back, your AI assistant flips the connector to **Connected**. The TestDino tools are available in any new chat.
## Verify the connection
Open a new chat and ask:
> Use the TestDino connector. Call `health` and tell me which projects I have access to.
Your AI assistant calls `health` and returns:
* Your user identity
* The connector's granted scope
* A tree of every organization and project the PAT can reach, each with a `projectId`
Save one `projectId`. Most prompts that follow need it.
If `health` returns an empty list, the PAT has no project access. Adjust its scope in TestDino, then disconnect and reconnect the connector in your AI assistant to refresh granted access.
## Troubleshooting
The PAT is missing, expired, or scoped to the wrong environment. Open **Profile → My Account → Personal Access Tokens** and confirm:
* The token starts with `td_pat_`
* It hasn't been revoked
* It includes the projects and modules you're trying to use
Generate a new token and reconnect the TestDino connector in your AI assistant if anything is off.
The PAT doesn't include that project in its scope. Either:
* Edit the PAT to add the project and module, or
* Generate a new PAT with broader scope, then disconnect and reconnect the connector in your AI assistant so it picks up the new token.
Common causes:
* You signed in to a different TestDino account than the one that owns the project you want to use.
* Your browser blocked the authorization redirect, typically due to third-party cookies or strict tracking protection. Allow cookies for `app.testdino.com` and `mcp.testdino.com` and try again.
* A stale popup window from a previous attempt. Close any open TestDino tabs, refresh your AI assistant, and start the connect flow again.
* Start a new chat. Most clients attach connectors at chat creation, not retroactively.
* Make sure the TestDino toggle is on for that chat (look for the icon next to the message input).
## Next Steps
Full parameters, input schemas, and video demos for every tool
Error messages, fixes, and editor-specific solutions
Run an AI audit of a Playwright suite via `get_audit_report` and `submit_audit_report`
Stream Playwright runs to TestDino with `@testdino/playwright`
After TestDino redirects back, your AI assistant flips the connector to **Connected**. The TestDino tools are available in any new chat.
## Verify the connection
Open a new chat and ask:
> Use the TestDino connector. Call `health` and tell me which projects I have access to.
Your AI assistant calls `health` and returns:
* Your user identity
* The connector's granted scope
* A tree of every organization and project the PAT can reach, each with a `projectId`
Save one `projectId`. Most prompts that follow need it.
If `health` returns an empty list, the PAT has no project access. Adjust its scope in TestDino, then disconnect and reconnect the connector in your AI assistant to refresh granted access.
## Troubleshooting
The PAT is missing, expired, or scoped to the wrong environment. Open **Profile → My Account → Personal Access Tokens** and confirm:
* The token starts with `td_pat_`
* It hasn't been revoked
* It includes the projects and modules you're trying to use
Generate a new token and reconnect the TestDino connector in your AI assistant if anything is off.
The PAT doesn't include that project in its scope. Either:
* Edit the PAT to add the project and module, or
* Generate a new PAT with broader scope, then disconnect and reconnect the connector in your AI assistant so it picks up the new token.
Common causes:
* You signed in to a different TestDino account than the one that owns the project you want to use.
* Your browser blocked the authorization redirect, typically due to third-party cookies or strict tracking protection. Allow cookies for `app.testdino.com` and `mcp.testdino.com` and try again.
* A stale popup window from a previous attempt. Close any open TestDino tabs, refresh your AI assistant, and start the connect flow again.
* Start a new chat. Most clients attach connectors at chat creation, not retroactively.
* Make sure the TestDino toggle is on for that chat (look for the icon next to the message input).
## Next Steps
Full parameters, input schemas, and video demos for every tool
Error messages, fixes, and editor-specific solutions
Run an AI audit of a Playwright suite via `get_audit_report` and `submit_audit_report`
Stream Playwright runs to TestDino with `@testdino/playwright`